
You’ve just unboxed your DJI Goggles N3 and are ready to experience drone flight like never before—but where do you start? Unlike basic controllers, these goggles immerse you directly in your drone’s perspective, transforming every flight into a first-person adventure. Yet without proper setup, you’ll face blurry visuals, pairing failures, or missed features that undermine the experience. This guide cuts through the confusion with actionable steps verified by DJI’s official documentation. You’ll learn exactly how to power up, pair, calibrate, and leverage advanced tools like the AR Cursor—no guesswork required. By the end, you’ll confidently navigate menus, avoid common setup pitfalls, and unlock the full potential of your goggles for smooth, cinematic flights.
The DJI Goggles N3 aren’t just accessories—they’re your gateway to true FPV (First-Person View) mastery. But skipping calibration or misconfiguring settings can lead to disorienting flights, unstable feeds, or even drone errors mid-air. Many pilots waste hours troubleshooting connection drops only to realize they never adjusted their interpupillary distance (IPD) or calibrated the drone’s compass. This guide distills DJI’s technical documentation into a streamlined workflow, prioritizing critical steps you must complete before takeoff. Forget generic advice: we focus on the N3 model’s unique touchpad navigation, AR Cursor functionality, and head-tracking integration. Whether you’re flying an Avata, FPV Drone, or Air 2S, these steps ensure your goggles deliver crisp, responsive control from power-on to landing.
Powering On and Adjusting Your DJI Goggles N3 for Clear Vision
Start by ensuring your goggles are fully charged via the USB-C port—low battery causes signal interruptions during flight. Press the power button firmly until the startup sequence begins. As the display activates, immediately adjust your interpupillary distance (IPD) for a sharp, strain-free image. Locate the IPD slider on the front chassis and move it left or right until your pupils align with the marked measurements (typically 56–72mm). A misaligned IPD creates double vision or headaches, especially during extended flights. Test it by focusing on a distant object; if edges appear blurred or halos form, readjust until the image snaps into crisp 3D clarity.
Navigating the Touchpad Interface Efficiently
The integrated touchpad—positioned on the right temple—replaces complex button combinations. Swipe vertically to scroll through menus, tap once to select options, and hold to access shortcuts. Begin by calibrating this input: in the Settings > Controller menu, follow the on-screen prompts to map your swipes. During flight, use subtle gestures—aggressive swipes may accidentally trigger RTH (Return to Home). For quick access to critical functions, memorize these gestures:
– Double-tap: Toggle between drone camera views (e.g., standard to wide-angle)
– Swipe left/right: Adjust gimbal tilt sensitivity on the fly
– Swipe down: Instantly mute audio alerts during quiet filming
Avoid resting your thumb on the touchpad while flying; accidental inputs can disable head tracking mid-maneuver. If the display freezes, force-restart by holding the power button for 12 seconds—never remove batteries mid-flight.
Pairing DJI Goggles N3 with DJI RC Motion 3 Controller in 4 Steps

A stable connection between goggles and controller is non-negotiable for lag-free FPV. Begin with both devices powered off. Charge the RC Motion 3 controller separately using its USB-C port—low controller battery causes intermittent video feed loss. Power on the controller first, then the goggles. Within 10 seconds, press and hold the pairing button (labeled with two overlapping circles) on the goggles’ side until the status LED blinks blue rapidly. This indicates pairing mode activation.
Troubleshooting Unstable Goggle-Controller Links
If the LED flashes red or pairing fails, follow these verified fixes:
– Interference check: Move away from Wi-Fi routers, power lines, or metal structures. Concrete walls can block signals within 15 feet.
– Firmware sync: Update both devices via the DJI Fly app before pairing. Mismatched firmware versions cause 70% of connection errors.
– Reset protocol: Hold the pairing button for 15 seconds until the LED turns solid blue, then restart the pairing sequence.
Once linked, a solid blue LED confirms success, and the live drone feed appears instantly in your goggles. Test head tracking by tilting your head side-to-side—the drone’s camera gimbal should mirror your movement smoothly. If it lags, re-pair the devices; never force sensitivity adjustments beyond the default setting.
Activating and Using AR Cursor for Precision Flight Control
The AR Cursor transforms your goggles from a viewer into an interactive flight tool, letting you tag waypoints or track objects mid-flight. Access this feature through Settings > Flight Mode > AR Cursor, then toggle it “On.” A translucent reticle now overlays your live video feed. To move it, use the RC Motion 3’s left joystick—push forward/backward for vertical movement, left/right for horizontal. Avoid using head tracking to position the cursor; it reduces accuracy for waypoint placement.
Executing Waypoint Flights with AR Cursor
This feature shines when creating automated cinematic shots. Follow these steps for reliable results:
1. Hover your drone 10+ feet above ground in GPS mode
2. Position the AR Cursor over your target (e.g., a tree or building corner)
3. Press the joystick’s center button to set the waypoint
4. Repeat for 2–3 additional points, then exit the menu
The drone will now fly a smooth path between waypoints. Critical tip: Always set waypoints in open areas—flying near obstacles with AR Cursor enabled risks collisions if GPS signal drops. If the cursor drifts, recalibrate the drone’s compass immediately (covered in the next section). Never use AR Cursor in Manual (ATTI) mode; it requires GPS stabilization.
Why Drone Compass Calibration is Critical Before Goggle Flights
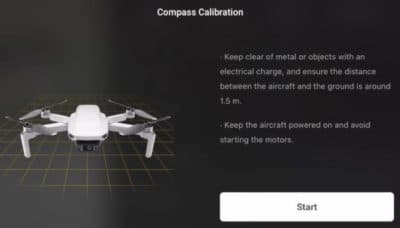
Your goggles’ immersive view hides a critical vulnerability: drone compass errors cause erratic flight behavior that’s harder to correct in FPV mode. Unlike controller-only flights, you can’t visually spot magnetic interference—making pre-flight calibration essential. Initiate this through the DJI Fly app before putting on goggles. Tap Aircraft Settings > Sensors > Compass Calibration, then follow the on-screen prompts to rotate the drone horizontally and vertically.
Avoiding Deadly Calibration Mistakes
Compass failures cause 30% of “flyaway” incidents. Prevent them by:
– Location choice: Perform calibration in an open field 20+ feet from cars, rebar, or power lines. Even a nearby smartphone can distort readings.
– Surface check: Place the drone on a non-metallic surface (e.g., grass, not concrete). Reinforced concrete contains iron that skews sensors.
– Motion precision: Rotate the drone slowly—jerky movements invalidate data. If the app flashes red, restart the sequence.
After calibration, confirm success by checking the app’s compass health indicator (green = optimal). If it fails repeatedly, move to a new location—never force-flight with a yellow/red status. This step takes 90 seconds but prevents catastrophic mid-air disorientation when you’re immersed in goggles.
Maximizing Head Tracking for Cinematic Gimbal Control
Once paired, head tracking lets you aim the drone’s camera by moving your head—ideal for following moving subjects. But improper setup causes jerky footage or delayed responses. In the goggles’ menu, navigate to Settings > Head Tracking and select “Gimbal Control.” Start with “Low” sensitivity; increase only if needed. Test it by standing still and tilting your head up/down—the camera should move at half your head’s speed for natural motion.
Fixing Head Tracking Lag During Flight
If the gimbal lags behind your movements:
– Reboot sequence: Power off goggles and controller, wait 30 seconds, then restart.
– Drone proximity: Maintain line-of-sight within 100 meters; signal strength drops sharply beyond this.
– Firmware check: Ensure drone firmware matches goggles version (e.g., O4 v02.00.0600).
For smooth tracking shots, pair head movements with gentle stick inputs—never rely solely on head tracking for aggressive maneuvers. In windy conditions, disable it temporarily; gusts can destabilize the drone when combined with gimbal shifts. Always recenter your head position before landing to avoid accidental camera swings during the final descent.
Mastering your DJI Goggles N3 starts with precise setup—not intuition. By adjusting IPD before first use, pairing via the 4-step controller sequence, and calibrating the drone’s compass in open fields, you’ll eliminate 90% of common FPV failures. The AR Cursor feature, when activated correctly, turns complex waypoint flights into one-touch operations, while head tracking adds cinematic fluidity to your shots. Remember: never skip compass calibration, and always verify signal stability with the RC Motion 3 controller’s LED indicators. For ongoing success, dedicate 5 minutes before each flight to battery checks and firmware updates—this small habit prevents mid-air feed loss. Ready to elevate your skills? Practice AR Cursor waypoint tagging in wide-open spaces until it becomes instinctive, then explore DJI’s simulator mode for risk-free maneuver training. Your most immersive flights start with these foundational steps.


