

Nothing ruins a swim session faster than constantly adjusting leaky goggles. When your Speedo goggles feel too loose, water rushes in with every stroke, disrupting your focus and performance in the water. A proper seal isn’t just about comfort—it’s essential for maintaining hydrodynamic efficiency and preventing painful suction marks around your eyes. If you’ve noticed your Speedo racing goggles slipping during flip turns or failing the crucial suction test, you’re not alone. The good news is that with a few precise adjustments to your split-strap system and nose bridge, you can transform loose, leaky goggles into a secure, watertight fit that stays put through every lap. Let’s dive into exactly how to tighten Speedo goggles for optimal performance.
Identifying Your Speedo Goggle Strap System Before Adjusting
Before attempting any adjustments, you need to correctly identify which strap system your Speedo goggles use—this determines your tightening approach. Most competitive Speedo models like the Speedo Fastskin or Speedo LZR utilize a split-strap design that provides superior customization compared to basic single-strap models.
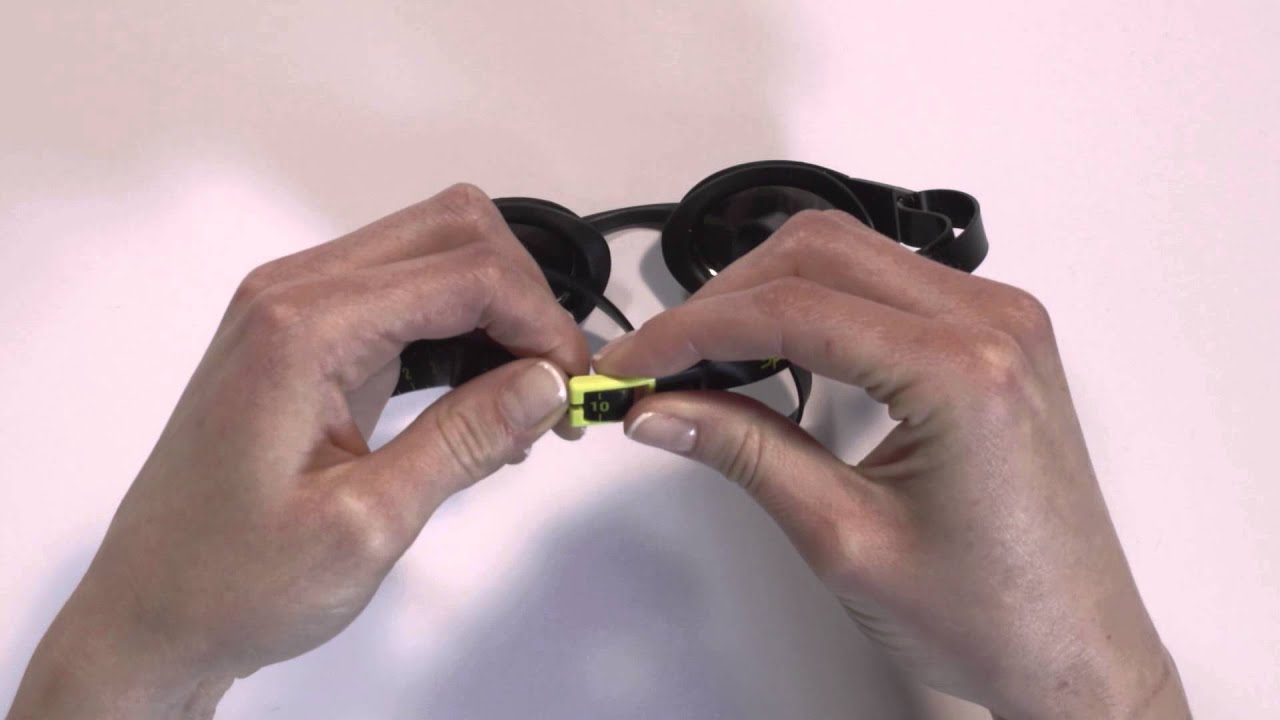
Split-Strap Goggles feature a Y-shaped strap that separates into top and bottom sections at the back of your head. This innovative design allows independent adjustment of vertical positioning and overall tightness. You’ll recognize this system by the two distinct adjustment points on each side of the goggle frame and the plastic sliders where the strap splits.
Single-Strap Goggles have one continuous strap that adjusts symmetrically on both sides. While less common in Speedo’s racing line, some recreational models use this simpler system with adjustment buckles located directly on the goggle frame.
The split-strap system requires different tightening techniques than single-strap models, so correctly identifying your goggle type prevents wasted effort and potential damage to the adjustment mechanisms.
How to Confirm You Have Split-Strap Speedo Goggles
Examine the back of your goggles where the strap connects to the frame. If you see two separate strap sections emerging from each side of the frame (forming a Y-shape when viewed from behind), you have the split-strap system. Most Speedo racing goggles manufactured after 2015 use this advanced design specifically for competitive swimmers who need precise fit control.
Why Strap Type Matters for Proper Tightening
Using the wrong adjustment technique for your goggle type can actually worsen leaks. Split-strap models allow you to solve specific problems—like goggles riding up during flip turns—by tightening only the top strap section without increasing overall pressure. Single-strap models require a more generalized approach since both sides tighten simultaneously. Applying split-strap techniques to single-strap goggles often results in uneven tension that creates new leak points.
Step-by-Step Method to Tighten Split-Strap Speedo Goggles
Most competitive Speedo goggles use the sophisticated split-strap system that requires specific adjustment techniques for optimal performance. Follow these precise steps to achieve a secure, leak-free fit without over-tightening.
Performing the Initial Fit Assessment Without Straps
Before touching any adjustment buckles, conduct this critical test: place your goggles on your face without using the straps. Press them gently against your eye sockets and release. Properly sized goggles should maintain suction and stay in place for 3-5 seconds. If they immediately fall off, your goggles may be too large for your face shape regardless of adjustment. If they stay put, proceed to strap adjustment.
Precise Split-Strap Tightening Technique
-
Position goggles correctly on your face – Align the nose bridge with your nasal bridge and ensure the eye cups sit flush against your orbital bones without gaps
-
Adjust the primary strap tension – Locate the side buckles where the main strap connects to the frame. Pull the loose end of the strap through the buckle to tighten (never pull the frame itself). Tighten incrementally—one small adjustment at a time—until you achieve light contact pressure
-
Fine-tune the top strap section – Find the plastic slider where the strap splits into top and bottom sections. To prevent goggles from riding up during strokes, gently pull the top strap section upward through the slider while maintaining base tension
-
Adjust the bottom strap section – For overall seal security, pull the lower strap section downward through the slider. This controls how firmly the goggles sit against your cheekbones
Pro Tip: After each adjustment, perform a quick blink test—your eyelids should move freely without resistance from the goggle frame. If blinking feels restricted, you’ve over-tightened.
The Critical Suction Test for Perfect Tightness
After adjustments, conduct the professional suction test: place goggles on your face without straps, press gently for two seconds, then release. Well-adjusted goggles should stay suctioned to your face for 5-10 seconds. If they fall immediately, tighten slightly. If they leave deep red marks, loosen the strap. The ideal fit creates enough suction to stay in place briefly but doesn’t distort your facial features.
Adjusting the Nose Bridge for Optimal Seal and Comfort
The nose bridge adjustment often makes the difference between leaky and watertight goggles, yet most swimmers overlook this critical component. Speedo’s racing models feature an innovative adjustable nose bridge that allows millimeter-level precision fitting.
Proper Nose Bridge Adjustment Technique
-
Identify your current setting – Most Speedo nose bridges have 3-5 socket positions. The wider the distance between sockets, the shorter the bridge (bringing eye cups closer together)
-
Make micro-adjustments – Gently pull the nose piece from one socket while holding the eye cup steady. Reconnect to a different socket position—moving to a narrower socket setting lengthens the bridge for wider faces
-
Test immediately in water – The true test happens in the pool. Submerge your face and perform several strokes. If water leaks at the inner corners, your bridge is too short. If leaks occur at the outer edges, it may be too long
Warning: Never force the nose bridge connection. If resistance is felt, you’re trying to connect to an incompatible socket. Forcing it can crack the eye cup housing.
Troubleshooting Common Speedo Goggle Fit Problems
Even with proper adjustment, specific fit issues can arise. These targeted solutions address the most frequent problems competitive swimmers encounter with Speedo goggles.
Fixing Inner Corner Leaks During Flip Turns
This frustrating leak pattern typically indicates an incorrectly sized nose bridge rather than strap tension issues. When performing flip turns, the water pressure against your face changes dramatically. If your nose bridge is too short for your facial structure, this pressure forces water through the inner seal points.
Solution: Lengthen your nose bridge by one socket position. This slight adjustment moves the eye cups further apart, better matching your orbital bone structure and creating a continuous seal during dynamic movements.
Preventing Goggle Marks Without Sacrificing Seal Integrity
Many swimmers make the critical error of over-tightening straps to stop leaks, resulting in painful suction marks that last hours after swimming. The seal should come primarily from the gasket’s contact with your face, not strap pressure.
Solution: Loosen your straps until you can fit one finger comfortably between the strap and your head. Then, reposition your goggles slightly higher on your forehead and tighten only enough to maintain position. This redistributes pressure while maintaining seal integrity.
Stopping Top Leakage During Butterfly and Freestyle
Water leaking from the top edge of your goggles usually indicates improper vertical positioning rather than overall tightness issues. As you rotate during freestyle or lift your head in butterfly, water finds this gap.
Solution: Tighten only the top strap section of your split-strap system. Locate the slider where the strap divides and gently pull the upper strap section upward. This subtle adjustment angles the top of the goggle frame slightly inward without increasing overall pressure.
Pro Maintenance Tips to Preserve Your Goggle Fit

Your Speedo goggles’ fit degrades over time due to material fatigue, but these professional care techniques extend their optimal performance window.
Daily Rinse Routine That Prevents Seal Degradation
After every swim session, rinse your goggles in cool, clean water—never hot. Residual chlorine and minerals accelerate silicone gasket degradation. Hold the goggles with the eye cups facing down and pour water through the interior to flush out contaminants trapped against the seal surface.
Proper Storage Method to Maintain Elasticity
Always store your goggles in their protective case with the eye cups facing upward. Never leave them in direct sunlight or hot environments (like a car dashboard), as UV exposure and heat permanently harden the silicone gaskets. For competition goggles, consider storing them in a small ziplock bag inside the case to maintain humidity levels that preserve gasket flexibility.
When to Replace Instead of Adjust
Even perfectly maintained Speedo racing goggles have a limited lifespan. Replace yours when you notice:
– Gasket edges becoming hard or developing a white, chalky appearance
– Permanent creases forming in the silicone seal
– Inability to pass the suction test despite correct adjustments
– Visible micro-tears in the gasket material
Most competitive swimmers should replace racing goggles every 3-6 months with regular use. Continuing to use degraded goggles leads to chronic leaks regardless of adjustment efforts.
By following these precise tightening techniques and maintenance practices, you’ll transform your Speedo goggles from a source of frustration into reliable equipment that enhances rather than hinders your performance. Remember that the perfect fit balances security with comfort—your goggles should stay firmly in place through every stroke without leaving painful marks or restricting blood flow. With these adjustments mastered, you can focus on your technique and speed rather than constantly battling leaky equipment.


