
Nothing ruins a perfect day in the sun like slipping, pinching, or unbalanced sunglasses. If your shades slide down your nose, leave red marks, or feel unstable during movement, the problem likely lies with the nose pads. The good news is fixing nose pads on sunglasses is often a quick, affordable, and entirely DIY-friendly task. Whether you need to replace worn-out silicone pads, adjust misaligned stems, or add grip to frameless designs, this guide walks you through every step.
From identifying your pad type to choosing the right replacements and using proper tools, you will learn exactly how to fix nose pads on sunglasses for lasting comfort and stability. By the end, you will know whether to tackle the repair yourself or call in the professionals.
Identify Your Nose Pad Type

Before touching any tools, determine how your nose pads attach to the frame. Choosing the wrong method can break nubs, strip screws, or warp stems. There are four main types, and knowing yours ensures a successful fix.
Snap-In Pads: Push-Fit Design
Snap-in pads are common on plastic, acetate, or TR-90 frames. Two small nubs on the frame insert into holes in the pad, with no screws involved. To spot them, look for clean, rounded posts with no visible hardware. If an old pad broke off cleanly leaving stubs behind, it is likely snap-in.
Pro Tip: Do not pull sideways. Always remove straight out to avoid cracking the nub base.
Screw-In Pads: Threaded Attachment
Screw-in pads are found on metal, semi-rimless, or high-end prescription-style frames. A tiny screw holds the pad to a threaded arm. Look closely. If you see a miniature screw head, often 1 to 2 mm, you are dealing with screw-in pads.
Warning: Over-tightening cracks soft silicone pads. Snug is enough.
Slide-On Pads: Friction-Fit Systems
Slide-on pads are less common but used in vintage or specialty frames. The pad slides onto a smooth metal arm without screws or nubs. It stays put via tight fit. Removal is simple. Slide straight off. Reinstall carefully to avoid bending the arm.
Welded Stem Pads: Non-Replaceable Units
Welded stem pads cannot be replaced at home. The pad and wire stem form one solid piece fused together. Attempting removal risks breaking the entire mount. If worn, seek professional repair or consider adhesive alternatives.
When in Doubt: Take a close-up photo with a ruler or coin for scale and send it to your optician. Many offer free ID help via email.
Measure and Match Replacement Pads
Using the wrong size pad leads to poor fit, instability, or pressure points. Accurate measurement ensures symmetry and optimal contact with your nasal bridge.
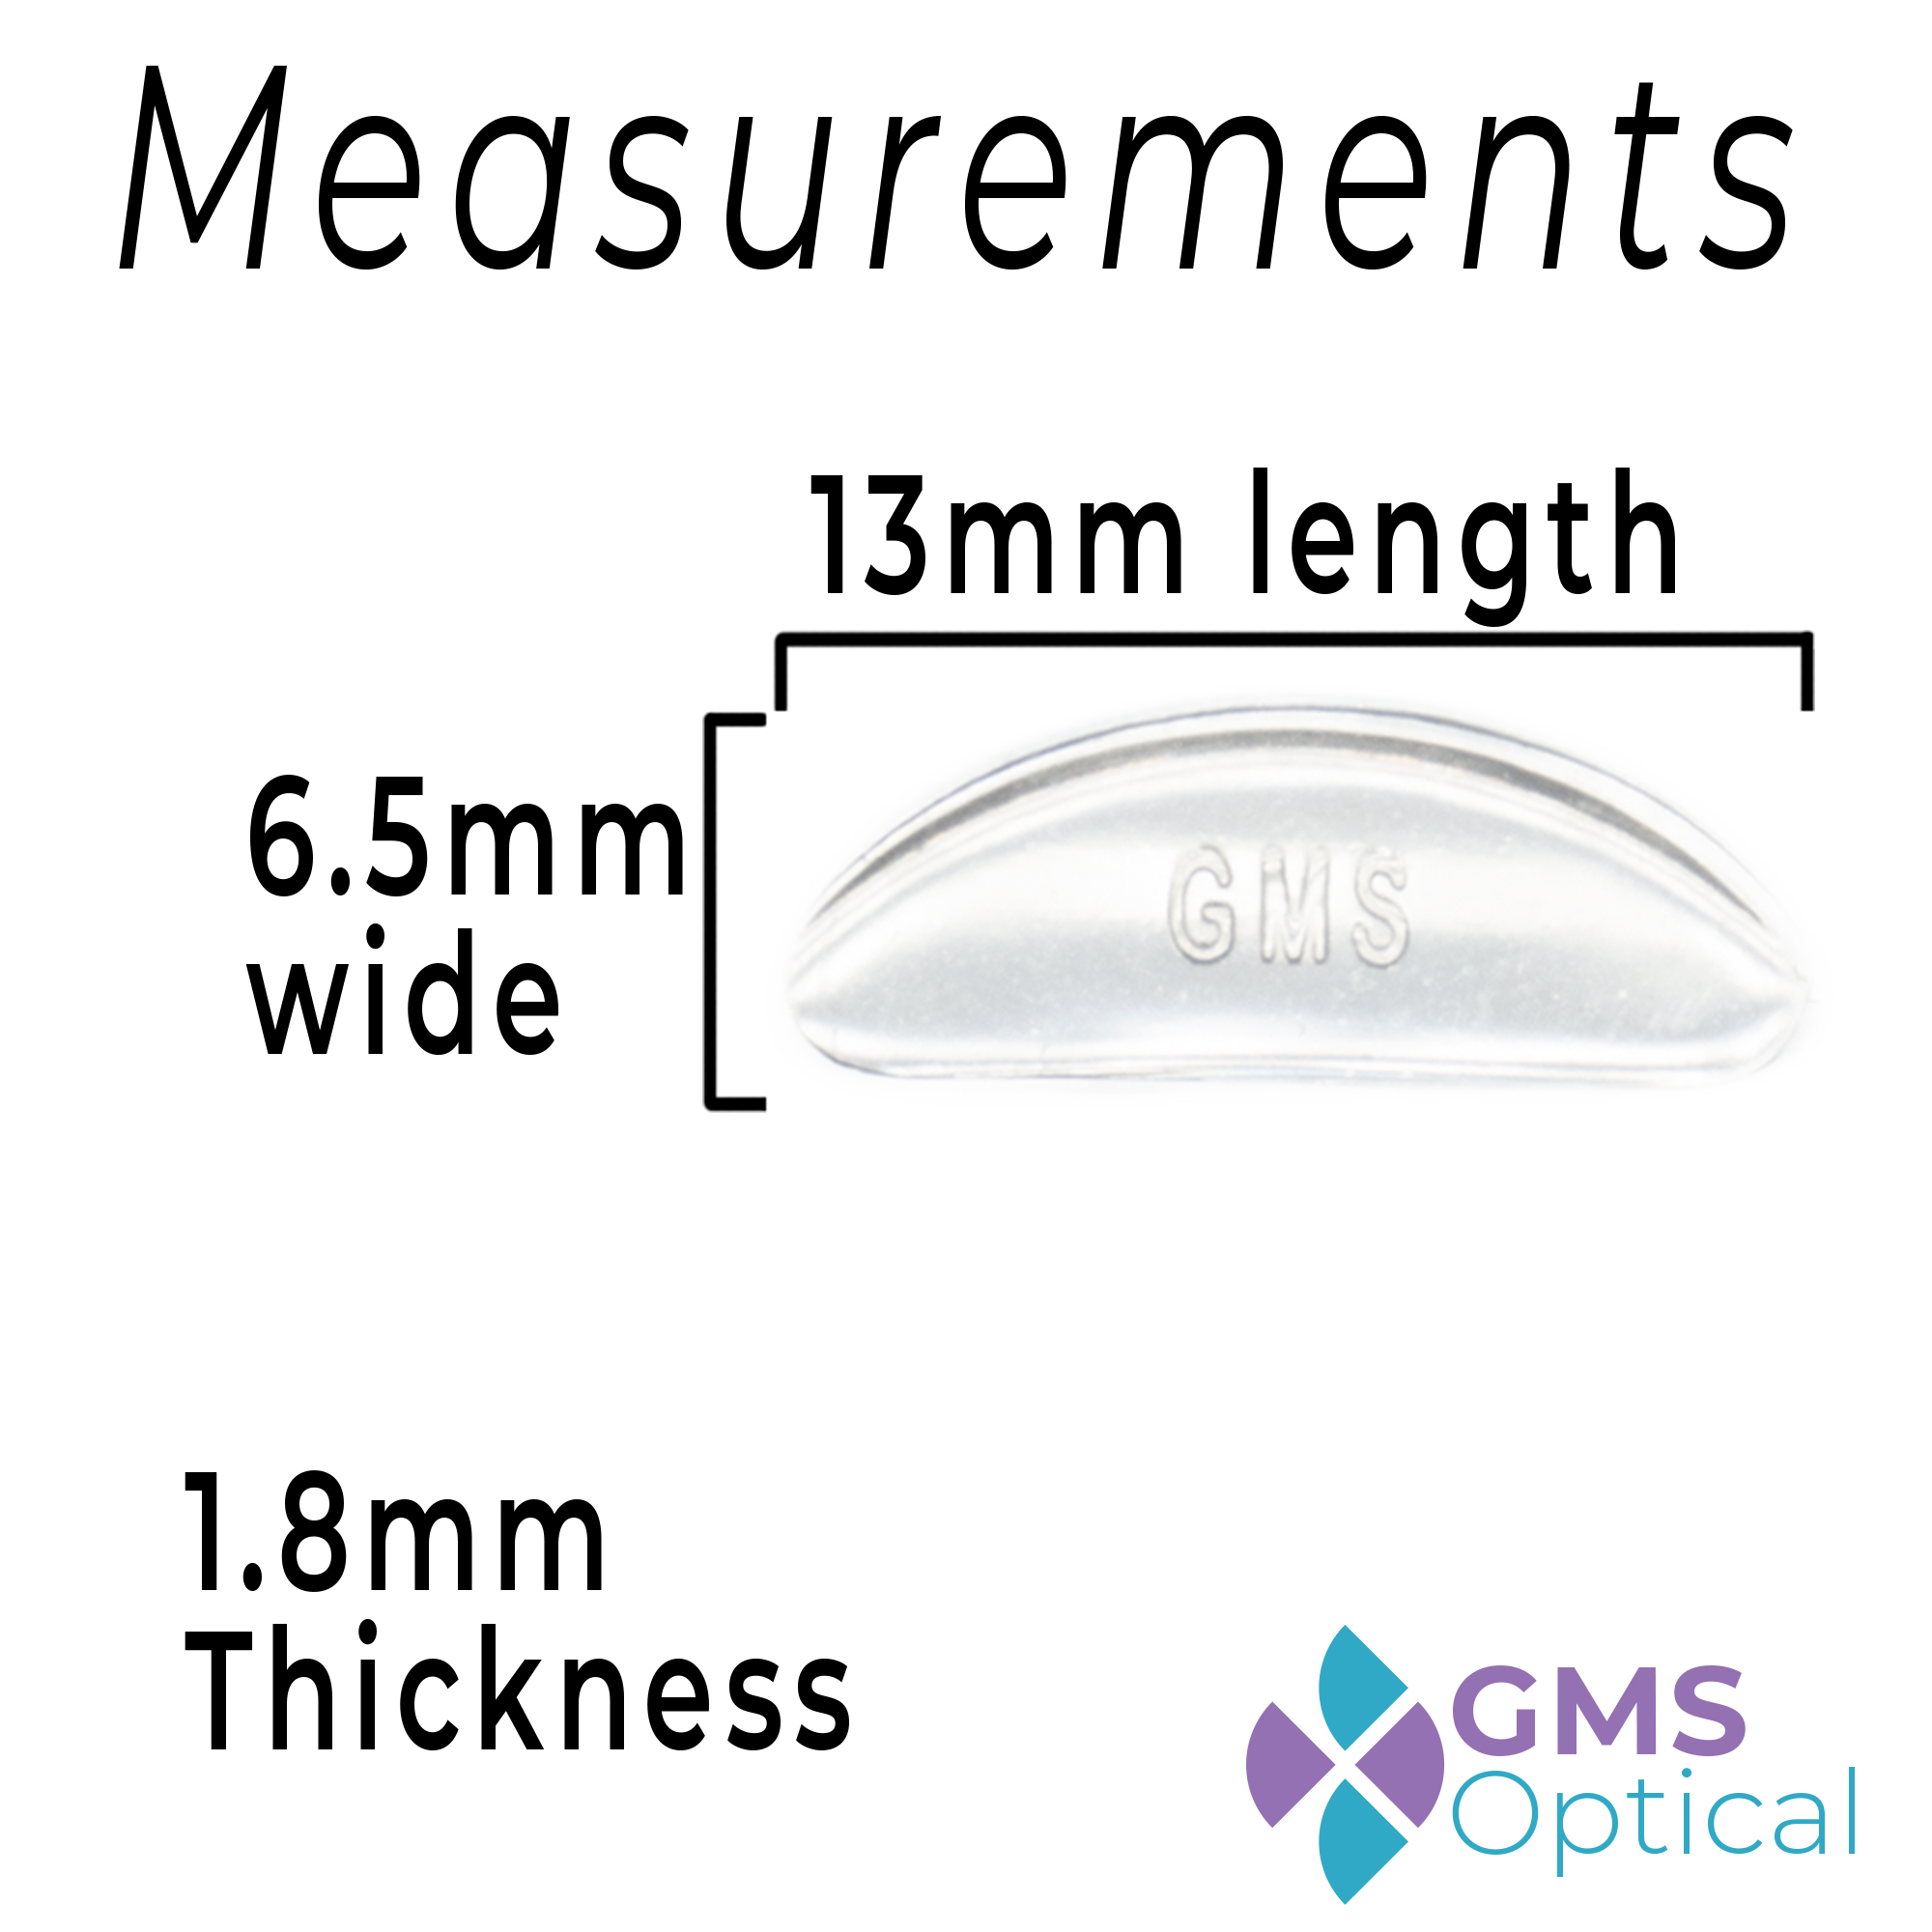
Measure Pad Width Accurately
Use a digital caliper or ruler to measure the widest point of the existing pad. Standard sizes range from 9 mm to 17 mm, with 12 mm, 14 mm, and 15 mm being most common. If the pad is missing, measure the gap between the nubs or screw head width as a guide.
Expert Move: Bring the old pad to an optical shop for exact matching. Many carry universal sets.
Match Material to Your Lifestyle
Not all pads are equal. Choose based on comfort, durability, and activity level.
- Best for daily wear and sensitive skin: Silicone
- Best for sports and sweat exposure: Silicone or rubber-coated
- Best for long-term durability: Hard plastic with metal base
- Best for budget fixes: PVC
- Best for no-mount frames: Adhesive gel pads
User Favorite: Clear silicone pads offer strong grip and a near-invisible look.
Source the Right Replacement Pads
Once identified and measured, find replacements that match size, type, and color.
Where to Buy
You can find replacement pads in several places. Online retailers like Amazon and eBay sell packs when you search for specific sizes. Optical supply stores like Opto-RX and Coastal.com sell bulk packs by type. Some opticians, such as Cut Opticians, offer free replacements via email when you provide size and type details.
Smart Buy: Multi-packs costing $5 to $15 include various sizes and types, ideal for future fixes.
Color Matching Tips
Choose pads that blend with your frame. Black works for dark frames. Clear provides a discreet look. Gold or silver matches metal-tone arms.
Note: Silicone pads may yellow over time. Replace every 3 to 6 months for best appearance.
Remove Old Nose Pads Safely
Improper removal damages frames. Follow these steps by attachment type.
Snap-In: Pull Straight Out
Grasp the pad firmly and pull straight away from the frame. No twisting. If stuck, use needle-nose pliers with a microfiber wrap to prevent marring. Apply even pressure until it releases.
Avoid: Prying with flat tools can crack the nub housing.
Screw-In: Unscrew Counterclockwise
Use a #0 or #1 Phillips screwdriver. Hold the pad arm steady and turn the screw counterclockwise. Keep the screw. It is reusable if undamaged.
Pro Tip: Place sunglasses on a soft cloth to catch falling screws.
Slide-On: Slide Off Gently
Slide the pad off the arm in the direction it was installed. Do not bend or force.
Welded Stem: Do Not Remove
These require professional repair. Do not attempt DIY replacement.
Final Check: Inspect pad arms for bends, corrosion, or damage before installing new pads.
Install New Nose Pads Correctly
Proper installation prevents slippage, asymmetry, and early failure.
Snap-In Installation: Align and Press
Follow these steps for snap-in pads.
- Match holes in pad to nubs on frame.
- Orient correctly. Narrow end down is standard.
- Press evenly with fingers until it clicks.
- If loose, try hard plastic or metal-base pads. They grip better than soft silicone. Use needle-nose pliers gently to apply full pressure.
Why It Matters: Soft silicone wears faster and may not hold under tension.
Screw-In Installation: Tighten Gently
Follow these steps for screw-in pads.
- Slide new pad over pad arm.
- Insert screw through pad into threaded hole.
- Tighten with miniature screwdriver until snug.
- Do not over-tighten. Risk of cracked pad or stripped thread.
Check Alignment: Both pads should project equally and sit level.
Slide-On Installation: Seat Fully
Follow these steps for slide-on pads.
- Slide pad onto arm in correct orientation.
- Push until flush with frame.
- Confirm no wobble or rotation.
Test Fit: Wear sunglasses and move your head. There should be no slipping or twisting.
Adjust Nose Pads for Perfect Fit
Even new pads may need alignment. Use tools, not fingers, for precision and hygiene.
Use Nose Pad Pliers for Bending
Fingers lack control and transfer oils. Nose pad pliers have curved, serrated tips that grip thin metal stems without slipping.
Alternative: Fine-tipped tweezers or needle-nose pliers. Use cautiously.
Make Small Incremental Bends
Adjust one pad at a time. One to 2 mm bends are enough. Re-test fit after each adjustment. Avoid repeated bending in the same spot. It causes metal fatigue and breakage.
Fix Common Fit Issues
- Problem: Slides down nose. Solution: Bend pads closer together or angle upward.
- Problem: Pinches bridge. Solution: Bend stems outward slightly.
- Problem: One side higher. Solution: Adjust individual pad until level.
- Problem: Sits too high. Solution: Angle stems downward.
Visual Check: From front view, center of nose pads should align with inner eye corners.
Add Nose Pads to Frameless Sunglasses
No built-in mounts? You can still improve grip and comfort.
Apply Adhesive Pads
Self-stick silicone, gel, or rubber pads adhere directly to the bridge. Follow these steps.
- Clean frame with mild soap and water.
- Dry thoroughly.
- Peel backing and press pad into place.
- Hold 10 seconds for strong bond.
Best For: Occasional wear, low-sweat environments.
Limitations of Adhesive Pads
Adhesive pads last 1 to 3 months. They may peel due to sweat, UV, or heat. They are not ideal for sports or daily use.
Upgrade Tip: Use 3M dual-lock tape for stronger hold. Still temporary.
Permanent Modification by Optician
For long-term use, an optician can sand the surface and drill holes to install pad arms. This enables screw-in or snap-in systems.
Risks: May void warranty, damage frame, or reduce resale value. Worth It? Only for high-value or irreplaceable sunglasses.
Clean and Maintain Nose Pads Monthly
Dirt, oils, and sweat accelerate wear. Regular care extends pad life and hygiene.
Clean with Mild Soap and Water
Follow these steps.
- Mix a few drops of dish soap in lukewarm water.
- Dip a Q-tip and scrub around pad base.
- Wipe surface gently.
- Rinse with damp cloth if removable.
- Dry with microfiber cloth.
Avoid: Alcohol, acetone, and ammonia degrade rubber and silicone. Abrasive cloths scratch frames.
Maintenance Schedule
- Clean pads weekly.
- Inspect for wear monthly.
- Replace pads every 3 to 6 months.
- Replace immediately if cracked, hardened, or loose.
Athlete Tip: Swimmers and runners replace pads monthly due to chlorine and sweat.
Choose the Best Nose Pad Material
Not all materials perform the same. Pick based on your needs.
Silicone: Best for Grip and Comfort
Silicone offers soft texture, non-slip surface, hypoallergenic properties, and sweat resistance. It wears faster, lasting 3 to 6 months, and may flatten over time. Ideal for daily wear, sports, and sensitive skin.
Top Pick: Clear silicone provides comfort and discretion.
Hard Plastic with Metal Base: Most Durable
This material lasts 1 to 2 years and offers secure snap-fit with resistance to deformation. Less cushioning is the tradeoff. Best for snap-in systems and frequent users.
PVC: Budget Option
PVC is inexpensive and widely available but yellows quickly and may irritate skin. Lifespan is 2 to 5 months. Use for short-term fixes only.
Rubber-Coated: For Active Use
Rubber-coated pads provide strong grip when wet and last 4 to 8 months. The coating may peel over time. Best for outdoor sports and humid climates.
Performance Winner: Silicone for comfort and grip. Durability Winner: Hard plastic or metal-base for retention.
Avoid Common Nose Pad Mistakes
Even small errors cause big problems. Steer clear of these frequent missteps.
Do Not Over-Tighten Screw-In Pads
Snug is sufficient. Over-tightening cracks silicone pads, strips threads, and warps pad arms.
Fix: If thread is stripped, use thread-locking fluid or consult an optician.
Do Not Bend Stems Too Much
Metal fatigue leads to breakage. Always make tiny adjustments and test fit before bending more. Stop if resistance increases.
If a Stem Breaks: Replacement may require professional soldering.
Do Not Ignore Asymmetry
Uneven pads cause one-sided pressure, headaches, and misaligned vision.
Check: Look in a mirror. Pads should mirror each other.
Do Not Touch Lenses During Repair
Oils from fingers smudge lenses. Always hold sunglasses by the bridge or temples. Use a microfiber cloth to clean if needed.
Do Not Use Harsh Cleaners
Alcohol and solvents degrade pad materials. Stick to mild soap and water only.
Troubleshoot Post-Repair Problems
Fixed the pads but still having issues? Diagnose with this checklist.
Sunglasses Still Slide Down
Possible causes include oily skin, worn pads, or incorrect angle. Solutions include replacing with anti-slip silicone pads, adjusting pads closer together or angling upward, or using nose grip strips.
One Side Presses Harder
Possible causes include asymmetric stem bend or frame twist. Solutions include realigning pads individually and checking temple alignment. If uneven, see an optician.
Red Marks or Discomfort
Possible causes include pads too tight, sharp edges, or material allergy. Solutions include loosening fit by bending stems outward and replacing with softer silicone or hypoallergenic options.
Nose Pads Fall Off
Possible causes include loose screw, broken nub, or degraded adhesive. Solutions include tightening the screw, replacing with metal-base snap-in pad, or using adhesive reinforcement.
Cannot Achieve Stable Fit
See an optician when pad arms are bent or broken, frame is warped, screws will not stay in, or you are unsure about the repair method.
Pro Tools: Opticians use frame warmers, alignment gauges, and micro-soldering for precise fixes.
Know When to Call a Professional
Some repairs go beyond DIY. Seek expert help in these situations.
Pad Arms Are Damaged
Bent, broken, or corroded arms need replacement or repair. This is delicate work requiring specialized tools.
Frame Is Twisted or Warped
Misaligned temples or bridge affect pad positioning. Opticians can realign with heat and precision tools.
Modifications Are Needed
Drilling, soldering, or adhesive bonding should only be done by trained professionals.
Sunglasses Are Vintage or High-Value
Preserve integrity with expert care. DIY risks permanent damage.
You Are Unsure of the Process
When in doubt, stop. A $10 repair kit will not help if you break the frame.
Free Help Available: Many opticians offer complimentary adjustments. Just walk in.
Final Thoughts on Fixing Nose Pads on Sunglasses
Fixing nose pads on sunglasses is one of the easiest ways to restore comfort, stability, and longevity to your favorite shades. With the right tools, a few minutes, and this guide, you can handle most issues at home. Identify your pad type, measure accurately, replace both pads, and adjust gently. Clean weekly, replace every 3 to 6 months, and keep a spare kit on hand. For damaged frames or complex systems, trust the pros. A well-fitted pair of sunglasses is not just stylish. It is functional, comfortable, and ready for anything.
Frequently Asked Questions About Fixing Nose Pads on Sunglasses
How Do I Know If My Nose Pads Need Replacing?
Signs include cracking, flattening, yellowing, hardening, or loss of tackiness. If your sunglasses slide down constantly or leave red marks, the pads are likely worn.
Can I Replace Nose Pads on Any Sunglasses?
Most snap-in, screw-in, and slide-on pads are replaceable at home. Welded stem pads and some one-piece plastic frames require professional help or adhesive alternatives.
What Tools Do I Need to Fix Nose Pads?
A miniature screwdriver, nose pad pliers or needle-nose pliers, tweezers, and a microfiber cloth. An eyeglass repair kit costing $10 to $20 includes everything you need.
How Often Should I Replace Nose Pads?
Replace every 3 to 6 months with regular use. Athletes and swimmers should replace monthly due to sweat and chemical exposure.
Can I Add Nose Pads to Sunglasses That Did Not Have Them?
Yes. Adhesive silicone or gel pads work for frameless designs. For permanent results, an optician can drill holes and install pad arms.
Why Do My Sunglasses Still Slide After Replacing the Pads?
The angle may be wrong. Bend pads closer together or angle them upward. Oily skin can also reduce grip. Try anti-slip silicone pads for better retention.


