

You’ve unboxed your new virtual reality goggles and now face the exciting but potentially confusing task of getting them up and running. Many first-time users struggle with the initial setup process, leading to frustration before they even experience the immersive worlds these devices promise. Properly using VR goggles requires understanding both hardware configuration and navigation techniques that transform your living room into a portal to digital dimensions. This guide walks you through every step needed to go from unboxing to exploring virtual environments with confidence—no prior experience required.
Unlike traditional gaming setups, VR goggles demand careful attention to physical space, equipment positioning, and personal comfort adjustments. The average user spends 20-30 minutes on their first VR setup, but following this streamlined process will cut that time significantly while ensuring optimal performance. Whether you’ve purchased an Oculus Quest, HTC Vive, PlayStation VR, or another model, the core principles of how to use virtual goggles remain consistent across most consumer systems. By the end of this guide, you’ll know exactly how to connect your headset, calibrate your play area, navigate virtual environments, and troubleshoot common issues that might otherwise derail your VR journey.
Connect Your VR Headset Hardware to PC or Console
Before experiencing virtual reality, you must properly connect all components to ensure seamless communication between your goggles and computing device. This initial connection process varies slightly depending on whether you’re using a PC-tethered, console-connected, or standalone headset, but follows the same fundamental principles.
Position Tracking Sensors for Optimal Coverage
For systems requiring external sensors like the Valve Index or older Oculus Rift models, placement accuracy determines tracking precision. Position your base stations or sensors in opposite corners of your play area, approximately 6.5 feet off the ground and angled downward toward the center of your space. Ensure no furniture or objects block the line of sight between sensors and your play area. Test sensor coverage by walking through your designated space while watching the tracking indicator in your headset—if the signal drops in certain areas, reposition the sensors slightly until you achieve consistent coverage throughout your play zone.
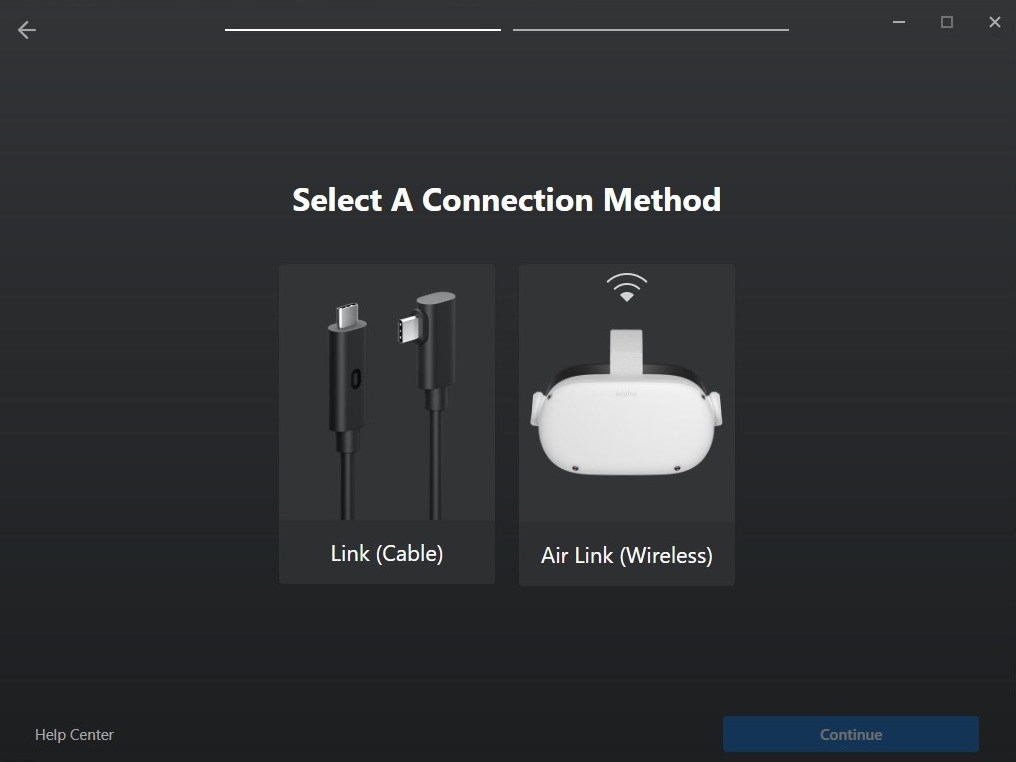
Establish Proper Cable Connections
PC-tethered VR goggles typically require multiple connections: HDMI or DisplayPort for video, USB for data transfer, and sometimes a dedicated power cable. Connect these cables to your computer first, ensuring you’re using the recommended ports (often directly on your graphics card rather than a USB hub). For standalone headsets like the Oculus Quest series, simply charge the device fully before first use. Console-based systems like PlayStation VR connect through a processing unit that links to both your console and television. Before powering on, double-check all connections are secure—loose cables cause the most common “no display” issues beginners encounter.
Configure Your Safe Play Area Boundary System
The play area setup is arguably the most critical step in learning how to use virtual goggles safely and effectively. This boundary system prevents you from walking into real-world obstacles while immersed in virtual environments.
Trace Your Physical Play Space Using Controller
Put on your headset and follow the on-screen setup wizard to define your guardian boundary. Using your motion controller like a virtual paintbrush, slowly trace the perimeter of your clear space on the floor by pointing the controller downward and pulling the trigger. Most systems require a minimum 6.5 x 6.5 foot area, but larger spaces provide more freedom of movement. As you trace, the system creates a virtual representation of your physical boundaries. Walk to each corner of your space to ensure the boundary aligns with actual room dimensions—this calibration prevents unexpected collisions during intense gaming sessions.
Test Boundary Visibility Before Full Immersion
After setting your play area, test the boundary system by walking toward the edge of your designated space. When you approach the virtual boundary, a transparent grid should appear, showing the location of real-world obstacles. Walk completely around your boundary to verify visibility from all angles. If the grid appears too late or not at all, restart the boundary setup process—proper boundary calibration prevents over 90% of VR-related accidents. For room-scale VR experiences, ensure no pets or people can enter your play area during use, as the boundary system won’t detect moving obstacles.
Adjust Headset Fit and Visual Clarity for Comfort

A poorly fitted VR headset causes discomfort, eye strain, and diminished immersion. Proper adjustment transforms your VR goggles from awkward equipment into a comfortable window to another world.
Perfect Your Headset Position and Lens Alignment
Wear your VR goggles like a baseball cap rather than regular glasses—the weight should rest primarily on the top and back of your head, not your nose and cheeks. Loosen all straps before putting on the headset, then gradually tighten the top strap until the device feels secure but not pressing against your face. Use the side dials to adjust the distance between your eyes and the lenses until the image snaps into sharp focus. If your model includes an IPD (Interpupillary Distance) slider, move it until the virtual image appears as a single clear picture rather than double vision—this adjustment is crucial for extended comfort.
Eliminate Light Leakage and Fogging Issues
Light leakage around the edges of your VR goggles breaks immersion and reduces visual quality. Adjust the facial interface padding to create a light seal without discomfort—most systems allow you to replace the default foam with alternative padding sizes. To prevent lens fogging (common with extended use), ensure proper airflow by not over-tightening the headset and taking short breaks during long sessions. If fogging occurs mid-session, remove the headset briefly rather than trying to wipe lenses while wearing it, which can scratch the delicate anti-reflective coatings.
Master VR Navigation and Movement Controls
Understanding how to move through virtual environments separates novice users from comfortable VR veterans. Movement mechanics differ significantly from traditional gaming and require specific techniques to avoid discomfort.
Choose Between Teleportation and Smooth Locomotion
Most VR experiences offer two primary movement methods: teleportation (point-and-click movement) and smooth locomotion (continuous movement using thumbsticks). As a beginner, start with teleportation—it significantly reduces motion sickness risk by eliminating the disconnect between visual movement and physical stillness. To teleport, point your controller at the desired location, watch for the target indicator, then press the trigger to instantly move there. Once comfortable with basic navigation, gradually introduce smooth locomotion by starting with short movement sessions and using in-game comfort settings like vignettes (tunnel vision effects during movement).
Learn Essential Controller Gestures for Interaction
VR controllers function as your virtual hands, requiring specific gestures for different interactions. The primary grip button (usually on the side) activates when you want to “grab” virtual objects—press it while pointing at an item to pick it up. The trigger button (typically on the front) performs actions like shooting, pulling, or selecting menu items. Practice basic interactions in tutorial environments: throwing objects, pressing virtual buttons, and manipulating tools. Remember that many VR applications require you to physically mimic real-world actions—pushing a virtual button requires actually pressing the controller button, not just pointing at it.
Fix Common VR Goggle Problems in Under 5 Minutes
Even with perfect initial setup, VR users encounter occasional technical issues. Knowing how to quickly resolve these problems keeps frustration low and immersion high.
Resolve “No Display” Issues Immediately
If your VR goggles show no image when powered on, first check all physical connections—loose HDMI or USB cables cause 80% of display problems. For PC users, verify your computer recognizes the headset in device manager. Standalone headset users should check battery level and power connections. If you see a display but it’s distorted or flickering, restart both your headset and computing device—this resolves most temporary software glitches. Never force cables into ports, as bent connectors create persistent connection issues that require professional repair.
Calibrate Controllers When Tracking Fails
When your motion controllers drift or disappear from view, battery issues or sensor obstruction are usually to blame. Replace controller batteries first—weak batteries cause erratic tracking behavior. Then verify your sensors have clear line-of-sight to the controllers; move furniture or objects blocking infrared signals. In brightly lit rooms, close curtains as natural light can overwhelm optical sensors. For inside-out tracking systems (where cameras are on the headset itself), ensure the front-facing sensors are clean and unobstructed. Most systems include a controller recalibration option in settings that realigns tracking coordinates when minor drift occurs.
Adjust Audio Settings for Immersive Sound
Poor audio quality breaks VR immersion as effectively as visual problems. If you hear no sound through your VR goggles’ built-in speakers or headphones, check audio output settings on your connected device—many systems default to computer speakers rather than the headset. For standalone headsets, verify volume levels aren’t muted. If audio seems directional (coming from wrong virtual locations), this indicates proper 3D spatial audio functioning—don’t adjust settings prematurely. Some headsets allow audio passthrough for hearing real-world sounds, crucial for safety during room-scale VR; learn how to toggle this feature quickly using controller shortcuts.
Final Note: Properly using VR goggles transforms your perception of digital environments from a novelty into a natural extension of your physical space. By mastering these setup and operation techniques, you’ve overcome the initial learning curve that prevents many users from experiencing VR’s full potential. Remember to take regular breaks during extended sessions, keep your play area consistently clear of obstacles, and periodically recalibrate your boundary system as room layouts change. As you become more comfortable, experiment with advanced features like hand tracking or multi-base station setups for larger play areas. The key to enjoying virtual reality long-term is consistent attention to proper setup—return to these fundamentals whenever you encounter issues or acquire new VR equipment.


