
Have you ever wanted to see in complete darkness without expensive military-grade equipment? Building your own infrared goggles unlocks night vision capabilities for wildlife observation, home security, or just exploring your surroundings after sunset. The good news is you don’t need specialized engineering skills to create functional infrared vision—just basic electronics knowledge and the right components. This guide reveals exactly how to make infrared goggles using affordable, readily available parts that transform ordinary vision into night vision capability. You’ll learn both beginner-friendly digital methods and more advanced techniques, with clear steps to avoid common pitfalls that ruin first-time builds.
Most commercial night vision devices cost hundreds or thousands of dollars, but a functional DIY infrared goggle system can be built for under $100. Unlike thermal imaging that detects heat signatures, infrared goggles use near-infrared light (700-1,400nm wavelengths) to illuminate scenes invisibly to the human eye. Your eyes can’t detect this light, but modified camera sensors can, converting it into a visible image on a small display. Whether you’re a hobbyist looking for your next electronics project or someone needing practical night vision for outdoor activities, this guide provides everything you need to build working infrared goggles from start to finish.
Why Your Digital Camera Can’t See Infrared Light (And How to Fix It)
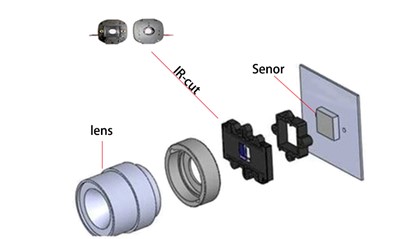
Standard digital cameras include an infrared cut filter that blocks infrared light to produce accurate color images in daylight. This filter must be removed or bypassed to create functional infrared vision.
Identifying the IR Cut Filter in Your Camera
Look for a small, square glass element positioned directly in front of the camera sensor. In most security or action cameras, this appears as a dark blue or purple filter that’s easily visible when you open the camera housing. Cheap board cameras (often used in car DVR systems) typically have the most accessible filters for removal. Before disassembling your camera, test it with a TV remote control—if you point the remote at your smartphone camera and press buttons, you’ll see the IR LED flash on your phone screen (since phone cameras lack strong IR filters).
Removing the IR Filter: A Delicate Procedure
- Power down and disconnect the camera completely before starting
- Carefully open the camera housing using precision screwdrivers
- Locate the IR cut filter—it’s usually held in place with adhesive or tiny clips
- Gently pry the filter loose using a plastic spudger tool (metal can scratch)
- Clean the sensor area with compressed air to remove any debris
- Reassemble the camera and test with a remote control to confirm IR sensitivity
Pro Tip: Some cameras use a mechanical IR cut filter that automatically slides out of the way in low light. In these models, you can simply disable the motor or remove the filter entirely for permanent IR sensitivity.
Required Components for a Budget-Friendly IR Goggle Build
Building functional infrared goggles requires specific components that work together to capture and display infrared light. Skip any of these, and your goggles won’t function properly in darkness.
Essential Parts List Under $100
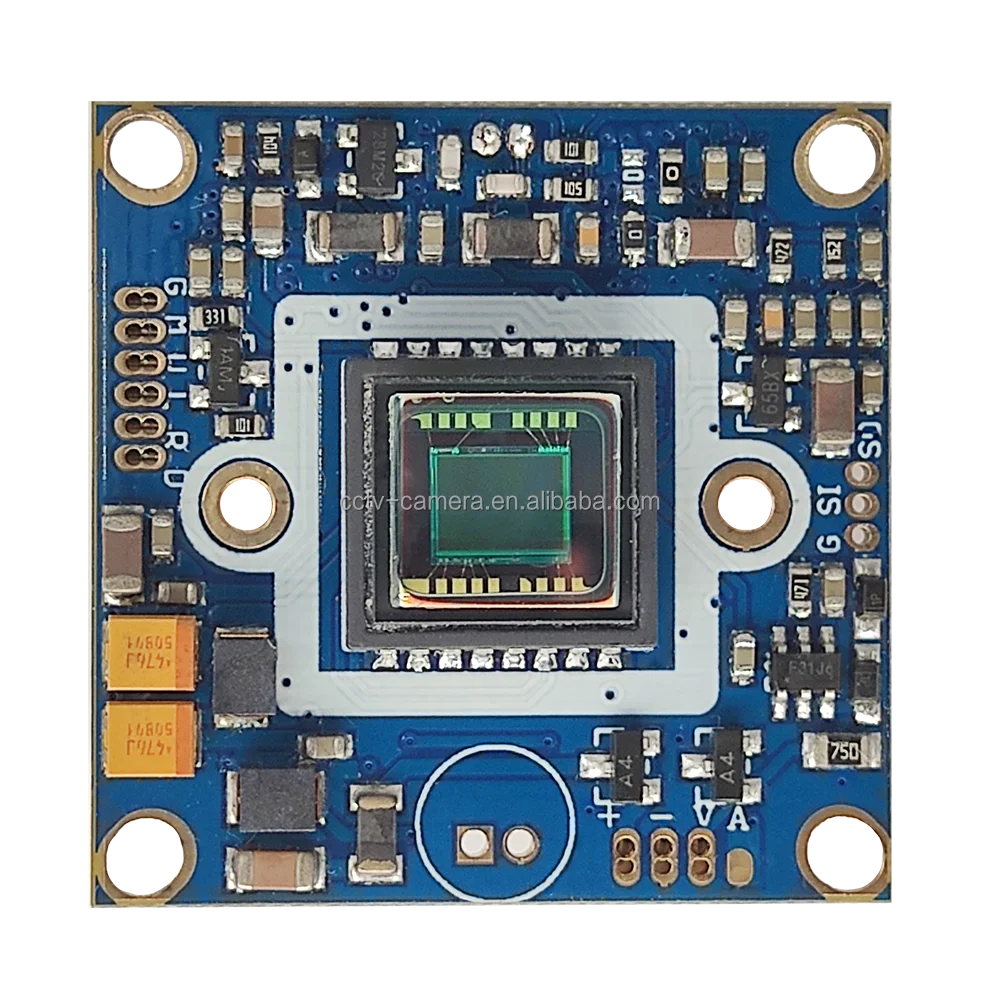
- Modified camera module: A 700TVL security camera board with IR cut filter removed ($15-25)
- IR illuminator: 850nm LED array (visible as faint red glow) or 940nm (completely invisible) ($10-20)
- Display system: 2.5-3″ TFT LCD screen for monocular view or dual screens for stereoscopic vision ($20-40)
- Power solution: 5V 2A power bank with voltage regulators ($15-25)
- Housing base: Ski goggles, safety glasses, or 3D-printed frame ($10-20)
- Wiring and connectors: 22-24 gauge wire, solder, and heat shrink tubing ($5-10)
Avoid This Common Mistake: Don’t use cameras with built-in IR LEDs—they’ll create feedback loops when used with your external illuminator. Remove any existing IR LEDs from your camera module before starting.
Building Your IR Illuminator for Complete Darkness Vision
Without an infrared light source, your goggles won’t work in pitch-black conditions. The illuminator is what makes true “night vision” possible by flooding your environment with invisible light.
Creating an Effective IR Light Array
- Select your LEDs: Choose between 850nm (slight red glow but better range) or 940nm (completely invisible but less efficient)
- Calculate power requirements: For 10 high-power LEDs, use a 5V 1A power source with 100Ω current-limiting resistors
- Solder components: Connect LEDs in parallel with individual resistors to prevent cascading failures
- Add focusing capability: Mount LEDs behind a plastic lens or use a collimating lens for longer range
- Test before final assembly: Verify coverage by viewing through your modified camera
Safety Warning: Never look directly into an active IR illuminator, even though you can’t see the light. Prolonged exposure can cause retinal damage at close range—treat it like a laser.
Mounting Your Display for Comfortable Night Vision
Poor display positioning causes eye strain and headaches, ruining the night vision experience. Proper alignment is critical for extended use.
Achieving Proper Eye Relief and Focus
- Measure your interpupillary distance (typically 55-70mm for adults) to position dual displays correctly
- Create adjustable mounts using 3D-printed brackets or flexible gooseneck holders
- Set optimal focal distance—most small displays work best 25-35mm from your eyes
- Add blackout baffles around each display to prevent light leakage between eyes
- Test alignment by focusing on a textured surface in daylight before night testing
Pro Tip: Use a simple magnifying lens between your eye and the display to increase the field of view. A 2-3x magnifier works well with most 2.5″ displays.
Wiring Your IR Goggle System Without Electrical Hazards
Improper wiring causes frustrating shorts, component damage, and even fire hazards. Follow these steps to create a reliable electrical system.
Creating a Safe and Efficient Circuit
- Start with a central power distribution board—use a small perfboard to organize connections
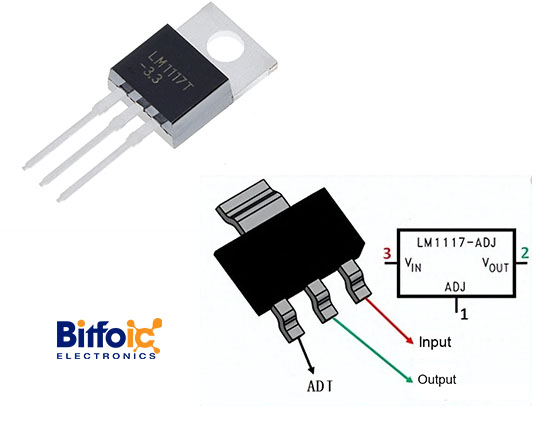
- Add voltage regulation—most displays need 5V while cameras may need 3.3V (use LM1117 regulators)
- Install individual power switches for the illuminator (to conserve battery when not needed)
- Use heat shrink tubing on all solder joints—electrical tape will fail over time
- Route wires through strain relief channels in your housing to prevent disconnections
Troubleshooting Tip: If your display flickers or cuts out, check for voltage drops—add a 1000μF capacitor across the power input to stabilize voltage during high-current demands.
Testing Your DIY Goggles: Troubleshooting Common Issues
Your first test run will likely reveal problems that need fixing before your goggles work properly. Here’s how to diagnose and solve the most frequent issues.
Fixing Image Quality Problems
-
Problem: Grainy or low-contrast image
Solution: Increase IR illuminator power or move closer to subjects—near-IR systems need sufficient light -
Problem: Visible red glow from illuminator
Solution: Switch to 940nm LEDs for completely covert operation (though range will decrease by 30-40%) -
Problem: Image lag or delay
Solution: Reduce display resolution or use analog video transmission instead of digital -
Problem: Uneven illumination with dark spots
Solution: Add a diffuser lens over your IR array or reposition LEDs for wider coverage
Critical Test: Before relying on your goggles in darkness, perform a daylight functionality check—view a scene through your goggles in normal light to verify all components work before you’re completely dependent on them in the dark.
Legal Considerations Before Using Your Homemade Night Vision
Many DIY builders overlook important legal restrictions that could land you in trouble when using homemade infrared goggles.
Understanding Night Vision Regulations
While owning infrared goggles is generally legal in most areas, specific restrictions apply:
– Hunting: Most states prohibit using any electronic night vision for hunting
– Public Property: Using night vision on public lands may violate local ordinances
– Privacy Laws: Recording people without consent using night vision may violate wiretapping laws
– Export Restrictions: High-performance components may be subject to ITAR regulations
Pro Tip: Check your state’s specific regulations before using your goggles—some states require special permits even for personal use on private property.
How to Extend Battery Life for All-Night Operations
Nothing ruins a night vision experience like dead batteries halfway through your adventure. These modifications dramatically increase operational time.
Power Optimization Techniques
- Use switching regulators instead of linear regulators (increases efficiency from 40% to 90%)
- Implement automatic brightness control based on ambient light levels
- Add a low-power mode that reduces illuminator output when not needed
- Choose OLED displays over LCD (50% less power consumption)
- Carry spare 18650 batteries instead of bulky power banks for extended missions
With these optimizations, you can extend typical 2-3 hour battery life to 6-8 hours—enough for a full night of observation.
Building your own infrared goggles transforms how you experience darkness, revealing a hidden world invisible to ordinary vision. By following these specific steps for camera modification, illuminator construction, and proper display mounting, you’ll create functional night vision equipment for a fraction of commercial costs. Remember to prioritize eye safety during testing, check local regulations before use, and start with the simpler digital system before attempting advanced intensifier tube builds. The ability to see in darkness opens new possibilities for wildlife observation, security, and exploration—so gather your components and begin your journey into the world of DIY night vision today. With practice, you might even develop modifications that surpass commercial offerings at a fraction of the cost.

