
You’ve just spent good money on a new pair of ski or snowboard goggles, but within minutes on the slopes, your forehead is throbbing and pressure points are forming around your eyes. Your vision is clear, but the discomfort is making it impossible to focus on the terrain. This frustrating scenario happens to countless winter sports enthusiasts who don’t realize that properly loosening goggles is the key to both comfort and performance. The good news? Achieving that perfect balance between secure fit and comfort takes just minutes once you know the right technique. In this guide, you’ll discover exactly how to loosen goggles without compromising their seal or security—so you can enjoy the mountain without the headache.
Tight goggles create more than just discomfort—they actually reduce your safety by causing distraction and visual fatigue. Most people mistakenly believe that tighter equals better seal, but the reality is that proper goggle fit comes from the foam contour matching your face shape, not from a stranglehold strap. When you learn how to loosen goggles correctly, you’ll eliminate pressure points while maintaining that crucial watertight seal against snow and wind. Whether you’re a beginner struggling with your first pair or a seasoned rider frustrated by recurring headaches, these adjustment techniques will transform your experience on the mountain.
Why Your Brand New Goggles Are Too Tight (And How to Fix It)
Manufacturers ship goggles with straps intentionally tight to prevent damage during shipping and display. That “one-size-fits-all” approach means your goggles need immediate adjustment for proper comfort. The key lies in understanding your specific goggle’s adjustment mechanism—most modern designs feature a single-point adjustment system where one continuous strap expands and contracts evenly when pulled through a central buckle. This system allows precise tension control without compromising strap symmetry, which is critical for maintaining an even seal around your entire face.
How Single-Point Adjustment Systems Actually Work
Unlike older dual-strap designs that required separate adjustments on each side, today’s single-point systems use a clever ladder lock mechanism that maintains perfect strap balance. When you pull the main strap through the buckle, both sides automatically adjust equally, eliminating the common problem of goggles shifting to one side. The ladder lock consists of small teeth that grip the strap when tension is applied but release when you press down on the plastic tab. Understanding this mechanism is essential because improper handling—like yanking the strap without releasing the lock—can damage the adjustment system and make future loosening impossible.
Why Most Goggles Need Loosening Right Out of the Box
That uncomfortably tight feeling you get with new goggles isn’t by accident—it’s intentional manufacturing practice. Retailers and manufacturers tighten straps to their maximum to keep goggles securely positioned on display racks and during shipping. Unfortunately, this “default” tight setting works for maybe 10% of wearers. The foam padding around the goggle frame needs to sit flush against your face without compression, and that requires significantly more slack than the factory setting provides. When you properly loosen goggles, you’re not compromising security—you’re restoring them to their designed functionality where the foam creates the seal, not the strap tension.
Critical Pre-Adjustment Safety Checks Before Loosening
Before you even touch those adjustment mechanisms, complete these three safety checks to prevent permanent damage to your investment. First, thoroughly clean both your hands and the goggle lenses with a microfiber cloth—oils from your skin can degrade anti-fog coatings over time. Second, inspect the strap for any existing damage like frayed edges or weakened elastic that might worsen during adjustment. Third, examine the buckle mechanism for debris; snow or dirt particles can jam the ladder lock and cause breakage when you attempt to loosen the strap.
Avoid These 3 Common Damage Risks When Adjusting Straps
Many goggle owners unknowingly damage their gear during adjustment by making these critical errors: forcing the ladder lock when it’s engaged (always press down on the release tab first), overstretching the elastic by pulling too vigorously, and ignoring helmet interaction (adjusting without your helmet on leads to improper tension). The most common irreversible damage occurs when users pull the main strap without disengaging the ladder lock, which can strip the teeth mechanism. To prevent this, always press down firmly on the plastic tab while simultaneously pulling the strap—never yank the strap alone.
What You Actually Need to Adjust Goggle Straps (Hint: It’s Not Tools)
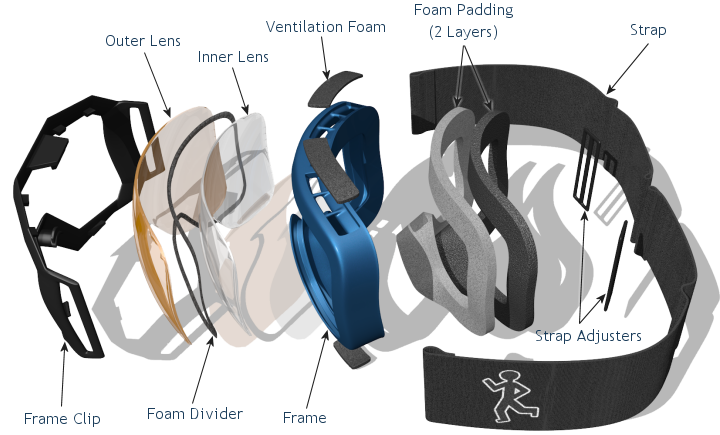
The beauty of modern goggle design is that you need absolutely no special tools to adjust strap tension—your fingers provide all the precision required. Most people waste money on “goggle adjustment tools” sold online when the real secret lies in understanding how to manipulate the built-in mechanisms correctly. The primary components you’ll work with are the quick-release buckle (usually at the back of the strap) and the ladder lock system (typically on one side near your temple). Some premium goggles feature additional micro-adjusters that allow millimeter-perfect tension control, but the fundamental loosening technique remains the same regardless of model.
Identifying Adjustment Points on Any Goggle Model
Regardless of brand or price point, all ski and snowboard goggles share similar adjustment mechanisms. The quick-release buckle is always positioned at the rear connection point where the strap ends meet, while the ladder lock appears as a small plastic slider with teeth—usually on the right side when wearing the goggles. Higher-end models may incorporate secondary tensioners or magnetic buckles, but these simply refine the basic system rather than replace it. When learning how to loosen goggles, focus first on mastering the primary ladder lock mechanism, as this controls 90% of your fit adjustment.
Step-by-Step Guide to Loosen Goggles Properly in Under 5 Minutes
The critical mistake most riders make is attempting to adjust goggles while they’re already on their face without their helmet. This approach guarantees improper tension because your helmet significantly affects the required strap length. Always begin with your helmet securely fastened—this creates the actual circumference your goggles must accommodate during use. Without this step, you’ll either end up with goggles that slip constantly or a strap tight enough to give you a migraine within 20 minutes on the mountain.
Why Helmet Placement Comes First (Most People Skip This)
Your helmet changes everything about goggle fit—it adds approximately 1-2 inches to your head circumference and creates pressure points where the goggle strap rests against the helmet’s edge. When you properly loosen goggles with your helmet already on, you account for these factors from the start. Try this test: adjust your goggles to perfect comfort without your helmet, then put your helmet on—you’ll immediately feel increased pressure as the helmet compresses the strap against your head. By reversing this order, you create a fit that works with your complete gear setup rather than fighting against it.
How to Release the Quick-Adjust Buckle Without Damage

Locate the quick-release buckle at the rear of your goggle strap—it typically features a small plastic tab protruding from the mechanism. Press firmly downward on this tab with your thumb while simultaneously pulling the main strap with your other hand. You should feel the buckle release with a slight click. Now pull approximately 2-3 inches of additional strap through the buckle to create significant slack. This initial loosening step is crucial because it establishes the baseline tension before fine-tuning with the ladder lock system.
Fine-Tuning Looseness with the Ladder Lock System
With your goggles positioned on your face over your helmet, locate the ladder lock mechanism near your temple. To loosen further, press down firmly on the plastic tab (away from the strap’s end) while pulling the main strap toward you. This disengages the teeth that hold tension. Add approximately 1/4 inch of slack at a time, then release the tab to test the new tension. The ideal fit feels almost too loose at first—your goggles should sit comfortably on your face without any pressure, yet remain securely in place when you shake your head vigorously. Remember: the foam seal creates security, not strap tension—if you’re relying on tightness to keep goggles in place, you’ve got the wrong frame shape for your face.
5 Costly Mistakes That Ruin Your Goggle Fit

Over-tightening remains the #1 cause of goggle-related headaches and discomfort, yet most riders do it instinctively when they feel their goggles might slip. A properly fitted goggle creates its seal through the foam’s contour matching your facial structure, not through strap pressure. When you over-tighten, you compress the foam unevenly, actually creating gaps where snow and wind can penetrate while simultaneously causing painful pressure points. The solution? Loosen your goggles until they feel slightly too loose, then verify the seal using the “suck test” (press goggles to clean face and inhale gently—if they stay put, the seal is good without tightness).
Ignoring Helmet Compatibility: Why It Matters
Not all helmets and goggles play nicely together—some helmet designs create pressure points where the strap rests, requiring additional slack. Premium goggle brands often design their frames to work optimally with specific helmet models, creating seamless integration that prevents strap slippage without excessive tightness. If you consistently struggle to loosen goggles enough for comfort with your current setup, consider whether your helmet’s rear profile might be interfering with proper strap positioning. Many riders solve chronic tightness issues simply by switching to a helmet with a smoother rear contour that works better with goggle straps.
Expert Tricks for Instant Goggle Comfort
When you’ve properly loosened goggles but still experience minor slippage, try this foam conditioning technique: gently press the foam gasket around the entire frame against a clean surface for 30 seconds. This compresses the foam slightly, allowing it to conform more precisely to your face shape without requiring additional strap tension. For immediate relief from pressure points, locate the problematic area and use your thumb to gently stretch the foam away from the frame—this creates a micro-adjustment that accommodates your unique facial contours.
The 10-Second Perfect Fit Verification Test
After adjusting, perform this quick verification: press your goggles firmly against your face without the strap, then inhale gently through your nose. If they stay securely in place (the “suck test”), you’ve achieved proper seal without strap tension. Next, put your helmet on with goggles in position and vigorously shake your head side-to-side and up-down. Properly loosened goggles will stay perfectly positioned without shifting or leaking. If they pass both tests, you’ve mastered how to loosen goggles correctly—you’re ready for hours of comfortable mountain time without headaches or distractions.

